Example with five LayerComponents (<i>pLc1--pLc5</i>) contained in three Layers (<i>pLayer1--pLayer3</i>)
Advanced Topics:
Vis owns two pure virtual interfaces that thus have to be implemented by non-abstract child classes: the Drawable heritage draw() and the own method createComponents(). Consequently, a minimal header of a derived visualization class would look like this:
#include <vrvis/Vis.hpp>
// ... (includes for MyVis, etc.)

class MyVis : public vrvis::Vis
{
  public:
  MyVis(...);
  ~MyVis(void);

  virtual void createComponents(void);
  virtual void draw(void);

  // ... (members, etc.)
};
The createComponents() method is to initialize potential VRVis members, i.e. Layers, LayerComponents, Actions, ActionSets, etc.---each of those will be discussed later in this chapter. The draw() method, on the other hand, is called in the course of drawing all Drawables. It is used for calling display lists, or for directly drawing GL primitives, and similar. Nevertheless, the visualization object's draw() method is often completely empty, as any created Drawable is automatically drawn in the drawing loop, and the visualization is normally composed of multiple other Drawables while not drawing anything itself. However, it should be mentioned that it is just as easy to draw something into the scene with a visualization object as it is with any other Drawable.
To summarize the facts once again: the example MyVis above is a child of Vis, which in turn is a child of Drawable. MyVis consequently can make use of all the abstract interfaces that both of its ancestor classes offer. For example, for MyVis to create a display list, it should implement the contextInit() interface offered by Drawable, and create a context-sensitive display list ID by calling Drawable's createListID() method. The display list can be called in draw() afterwards.
Its VR Juggler heritage enables VRVis to do without a large main() function, but instead use application objects to do all the work. Thus, the only thing, a main() method in a VRVis application has to do, is create an object of the VisApp class and tell it, which visualization object to use during runtime. A typical main() would look like this:
#include <vrvis/VisApp.hpp>
// ... (includes for the MyVis class)

using namespace vrvis;

int main(int argc, char** argv)
{
  visInit(argc, argv);

  MyVis* pVis = new MyVis(...);
  VisApp* pApp = new VisApp(pVis);

  pApp->exec();

  delete pApp;
  return 0;
}
The namespace method visInit() forwards the VR Juggler config files given on the command line to the VR Juggler kernel, which now loads the right drivers and configurations for the given devices, etc. given in the .jconf files. The VisApp constructor expects an object derived from Vis as its only argument. This object is used for the forwarding of the virtual method calls of the vrj kernel. The exec() method of the VisApp class finally starts up the VR Juggler kernel and enters the Juggler main loop, during which the VR devices are updated and context-dependent methods are called. VisApp is the only VRVis class that directly implements VR Juggler interfaces; it forwards calls to the appropriate other VRVis objects at the appropriate time.
Image objects are created simply by instantiating the Image template with the data type of an image as template argument and the path to the image file as regular argument, for example:
Image<int>*   pImg1 = new Image<int>  ("/path/intImage.img");
Image<float>* pImg2 = new Image<float>("/path/floatImage.img");
Any image format that can be handled by GDAL, can also be accessed through VRVis's Image class---as long as the template data type is accurate, of course. For a complete list of supported image formats see GDAL.
Once an Image is created, the ImageBands can easily be accessed by their band numbers (1 <= band no. <= number of bands contained in the image). They are, of course, of the same template data type as their containing Images. Examples to extract bands from the above images would be:
ImageBand<int>*   pBand2Img1 = pImg1->getBand(2);
ImageBand<int>*   pBand3Img1 = pImg1->getBand(3);
ImageBand<float>* pBand5Img2 = pImg2->getBand(5);
ImageBand<float>* pBand7Img2 = pImg2->getBand(7);
The created Image and ImageBand objects are the source for an abundance of information: image sizes, names, number of bands, minimum and maximum values, and---last but not least---the actual data arrays in the ImageBands. If this still is not enough information, one can access the GDAL data types inside the classes (GDALDataset and GDALRasterBand) and exploit the features GDAL has to offer.
An Image retains ownership of its contained ImageBands, so only the parent Image's destructor has to be called by the user to properly destruct all of the image's representations in VRVis.
For example, here are two LayerComponent constructors with ImageBands as the RasterData objects, named similar to the ImageBands created above:
LayerComponent* pLc1 = new LayerComponent
(
  pBand4Img1, vrvis::RED,
  pBand3Img1, vrvis::GREEN,
  pBand2Img1, vrvis::BLUE
);

LayerComponent* pLc2 = new LayerComponent
(
  pBand7Img1, vrvis::GREEN
);
Both examples technically create RGB images; the first one combines three ImageBands as all three available color components, the second one displays only data from one ImageBand in a green color. Although only the first example exploits the full capacity of the created textures right from the start, both objects create GL texture objects of identical size. This is, because any textures of a LayerComponent still can be changed in a VRVis application after the initial object creation---whether the color components of the texture are used in the beginning or not.
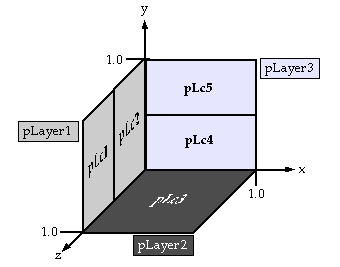
Before a LayerComponent can be used in a visualization, it has to be added to a Layer. Layers are restricted planes that are initialized to a certain absolute size, that VRVis measures in meters by default. They are initially placed in the drawing origin of the visualization, spanning towards the positive x and y axes, and can be moved to any desired position and rotation afterwards. The following example creates three square Layers lying perpendicular to each other in the positive area of the coordinate planes:
Layer* pLayer1 = new Layer(1.0, 1.0);
pLayer1->moveTo(0.0, 0.0, 1.0);
pLayer1->rotateDegrees(0.0, 90.0, 0.0);

Layer* pLayer2 = new Layer(1.0, 1.0);
pLayer2->moveTo(0.0, 0.0, 1.0);
pLayer2->rotateDegrees(-90.0, 0.0, 0.0);

Layer* pLayer3 = new Layer(1.0, 1.0);
As the lower left corner of each Layer is its point of reference, the lower left corners of the first two example Layers are moved to their correct position before the Layers are rotated appropriately. The third example is not moved at all, but stays in its initial position.
A Layer can hold any number of LayerComponents, as long as they do not interfere with each other. To add them to a Layer, one has to call the addComponent() method of the designated Layer and to specify origin (x, y) and size (x, y) relative to the Layer. The following example adds five LayerComponents (pLc1--pLc5) to the Layers constructed above:
pLayer1->addComponent(pLc1, 0.0, 0.0, 0.5, 1.0);
pLayer1->addComponent(pLc2, 0.5, 0.0, 0.5, 1.0);
pLayer2->addComponent(pLc3);
pLayer3->addComponent(pLc4, 0.0, 0.0, 1.0, 0.5);
pLayer3->addComponent(pLc4, 0.0, 0.5, 1.0, 0.5);
The default values for relative size and origin in the addComponent() method make the LayerComponent as large as the whole Layer to which it is added to. So the result of the above line to add the LayerComponent named pLc3 is identical to the explicit call of
pLayer2->addComponent(pLc3, 0.0, 0.0, 1.0, 1.0);
They both place the component at the lower left corner, and make it span to the whole extent of the containing Layer.
The first two LayerComponents above are added side-by-side in their Layer, the third component fills the whole Layer alone, and the final two are stacked on top of each other. Below, the visible result is depicted schematically.
Example with five LayerComponents (<i>pLc1--pLc5</i>) contained in three Layers (<i>pLayer1--pLayer3</i>)
RotateXAction* pRotXAct   = new RotateXAction();
ToggleAction*  pToggleAct = new ToggleAction(toggleVariable);
While the RotateXAction constructor does not take any parameters, the constructor of ToggleAction takes a variable which is to be toggled by the ToggleAction.
The next step would be the creation of a new ActionSet to which the Actions can be added. As ActionSets are connected to the input hardware, it is the responsibility of the Input class to create ActionSets. The pointer to the responsible Input object can be obtained in a visualization class (derived from Vis) by calling the getInput() method. The creation of an ActionSet named "MyActionSet" thus would look like this:
Input* pInput = getInput();
ActionSet* pSet = pInput->createActionSet("MyActionSet");
After having created an ActionSet, Actions can be added to it by specifying the device proxy that is supposed to trigger them when the containing ActionSet is active. There are two methods to accomplish this, depending on whether the Action to be added is derived either from AnalogAction or DigitalAction. Adding the Actions instantiated above to "MyActionSet" is done like that:
pSet->addAnalogAction ("VJAnalog0", pRotXAct);
pSet->addDigitalAction("VJButton0", pToggleAct);
Both of the two Actions are now connected each to a specific---analog or digital---input device, and are triggered continuously with the respective device state while "MyActionSet" is activated.
VRVis contains a number of pre-implemented Actions that are useful in a variety of potential applications and therefore already integrated in the core toolkit. First of all, there are several Actions that are used for transformations of the visualization scene; in detail these are:
These transformational Actions can be added to an ActionSet just like any other Action through the set's addAnalogAction() and addDigitalAction() methods. As scene transformations are part of nearly every visualization application, and need to be highly configurable, VRVis additionally provides a "default ActionSet"---an ActionSet that is also created through the Input class, but is already filled with all default Actions that are configured in the VRVis config file. The call
ActionSet* pDefaultSet = pInput->createDefaultActionSet();
creates a new ActionSet that contains exactly those digital and analog Actions that are listed behind the corresponding device proxy in the vrvis.cfg. For example, the line
VJButton1=ZoomOut
of an example config file results in a ZoomOutAction configured with the digital device proxy ``VJButton1" added to the default ActionSet on startup of the visualization; the same is done for any device proxy that has a default Action assigned. By providing such a configuration option for the transformational Actions, their layout on the VR device can be varied just by changing the config file. A recompilation is in this case not necessary, and changes can be done on the fly.
VRVis offers two more simple Actions that can be instantly added to own visualizations: ToggleAction and SelectAction. Both are derived from DigitalAction, i.e. are activated upon release of a button. ToggleAction takes a reference to a boolean value as a constructor argument which is toggled on release of the button. This can be used for multiple purposes in a visualization, e.g. switching light on and off, display some information or not, and similar.
A SelectAction on the other hand receives in its constructor a list of objects implementing VRVis's Selectable interface. Selectable is a very simple state handling interface that enables derived classes to be selected, deselected, and queried for their selection state. What such a derived class does with this information is in the hand of the programmer; typically it is used with Drawables that are displayed differently (e.g. with a border or colored if selected. The SelectAction now takes a list of such Selectables and switches through this list in a radio-button like manner. The selection information then can be used in other Actions that operate on the object selected at that time, e.g. a color adjustment of one of many displayed color planes, or similar.
The Drawable interface consists of several virtual methods that may be implemented as desired, dependent on the targeted execution time slot. A very simple example Drawable named "Line" would have the following minimal header:
#include <vrvis/Drawable.hpp>

class Line : public vrvis::Drawable
{
  public:
  Line(void);
  ~Line(void);
  virtual void draw(void);
};
To draw visible OpenGL graphics into the scene, one has to implement the draw() method of the Drawable. In the example case of a line, the implementation code might look like this:
void Line::draw(void)
{
  glBegin(GL_LINES);
    glVertex3f(0.0f, 0.0f, 0.0f);
    glVertex3f(1.0f, 0.0f, 0.0f);
  glEnd();
}
This is all that has to be done programmatically; the draw() method is automatically called correctly by all active contexts during VR Juggler's drawing loop. It draws a simple line spanning from the drawing origin one meter along the x-axis. Normally, derived Drawables have more own functionality and member variables, of course. By default, a Drawable is visible, but can be hidden and made visible again by calling its hide() and show() methods. A hidden Drawable's draw() method is skipped in the drawing loop.
As soon as the graphics to be drawn get more than just a single GL line, one might think about using OpenGL display lists for performance enhancement. The creation of display lists should take place in a Drawable's contextInit() method, as it is called correctly so that each GL context owns a separate copy of the list. Adding a contextInit() method and using the display list features the Drawable interface offers, the above implementation of the "Line" class would expand to this:
void Line::contextInit(void)
{
  glNewList(createListID("LineList"), GL_COMPILE);
    glBegin(GL_LINES);
      glVertex3f(0.0f, 0.0f, 0.0f);
      glVertex3f(1.0f, 0.0f, 0.0f);
    glEnd();
  glEndList();
}

void Line::draw(void)
{
  glCallList(getListID("LineList"));
}
The ListID methods of the Drawable interface enable a programmer to use real names---like in this case "LineList"---for their created display lists, which is easier to handle than integer values for a potential variety of lists to be generated. If multiple lists are created in contextInit(), the Drawable API offers a drawAllLists() method to draw all the display lists that have been created by this Drawable.
Any operations that change such context-sensitive data like display lists during runtime, should be done in a Drawable's contextUpdate() method. This method can be implemented by a Drawable and is for performance reasons not called automatically. If an application wants to have a Drawable's contextUpdate() method executed, it has to set its "ContextUpdate" flag by calling its setContextUpdateFlag() method. Upon doing so, contextUpdate() is executed exactly once for each GL context; the flag is unset afterwards.
The final and most simple virtual method that Drawables offer, is the init() method. It is called only once in a Drawable's life cycle and it is to initialize context-independent data, prior to the drawing and OpenGL even having started.
Each derived Action has to pass a name string to its parent constructor, in order to be able to access every available Action by name. Furthermore, all executable Actions have to implement a specific execute() method, again dependant on the type of connected device proxy. All available execute() methods in the currently active ActionSet are called once for each frame with the current value of the connected proxy as an argument.
For example, the implementation of a custom DigitalAction named "MyAction" that simply writes the current button state to the console could be done like this:
...
MyAction::MyAction(void) : DigitalAction("MyAction") { ; }

MyAction::execute(const gadget::Digital::State cButtonState)
{
  switch (cButtonState)
  {
    case gadget::Digital::OFF:
      std::cout << "OFF" << std::endl;
      break;
    case gadget::Digital::ON:
      std::cout << "ON" << std::endl;
      break;
    case gadget::Digital::TOGGLE_OFF:
      std::cout << "TOGGLE_OFF" << std::endl;
      break;
    case gadget::Digital::TOGGLE_ON:
      std::cout << "TOGGLE_ON" << std::endl;
      break;
  }
}
...
Since the received button state is coming directly from VR Juggler, its symbolic enumeration is contained in the Juggler namespace gadget::Digital. The only differences for deriving from an AnalogAction instead are firstly that the name string has to be passed to the AnalogAction parent constructor and secondly, that the execute() method receives a float value in the range of 0.0 to 1.0 as an argument.
A common difficulty when developing Actions is that it is often necessary to share information between different Actions of the active ActionSet; e.g. one wants to select a scene item with a SelectAction and change its color afterwards smoothly with a custom AnalogAction. The AnalogAction would have to access the currently selected Selectable to change its color.
There are two design patterns that VRVis uses for this kind of information interchange between different Actions:
There might be dozens of additional ways to accomplish this sharing of data variables between Action classes which also can be used, of course. The above two were chosen for VRVis due to their simplicity and clarity.
 1.3.8
1.3.8